Odontoscope® facilitates oral health screening and monitoring among dependent older adults in both domiciliary and long-term care environments.

Tarification


Odontoscope® is a comprehensive solution that includes:

  • an individual medical device designed to facilitate visual examination of the oral cavity and the standardized capture of intraoral photographs,

  • a dedicated application for the structured documentation of clinical observations, compliant with OHAT and interRAI Oral Health Scale (OHS) grids,

  • online training covering the use of the Odontoscope® and a clinical guide for assessing the oral health status of elderly residents,

  • the secure transmission of data to enable remote dental teleconsultation by a licensed dentist*.


Odontoscope® is marketed exclusively to institutions in France and Belgium.

  • Unit price: €20 (excl. VAT)

  • Packaging: sold in boxes of 10 units (€200 excl. VAT per box)

  • Minimum order: 2 boxes (i.e. €400 excl. VAT)


The device is intended for individual use and can be reused by the same resident as often as needed (initial screening, complaints, follow-up), provided it remains clean and undamaged.

🇬🇧 Coverage by Health Insurance Funds

In Belgium, each dental tele-expertise request is reimbursed at €15, covered by mutual insurance funds under the applicable conditions.

In France, each tele-expertise request is invoiced at €20. It is performed via the Omnidoc platform and is reimbursed by the French National Health Insurance (Assurance Maladie) in accordance with existing regulations.


💰 Reimbursement

The individual Odontoscope® medical device may be charged back to the resident by the care facility (MRS, EHPAD), in the same way as any recognized medical device. Odontoscope® is CE-marked, registered in EUDAMED, and officially declared to the Belgian Federal Agency for Medicines and Health Products (FAMHP).

The Odontoscope® application may also be eligible—depending on the resident’s insurance policy—for partial or full reimbursement by their health insurance fund.

Upon request, a personalized invoice can be issued in the resident’s name, to be submitted together with a medical prescription when applying for reimbursement.

Neither FSBD nor Odontoscope® can guarantee reimbursement, as this depends on the specific criteria of each insurance provider.

The Oral Tele-expertise Form

Best practices for taking a usable photo


Conducting a Visual Oral Health Examination in Elderly Individuals

To perform a visual oral health examination and take photographs suitable for documentation, it is essential to create a comfortable and reassuring environment. Ideally, the oral examination should take place in the privacy of the resident’s room.

  • Lighting

    Natural Light: Whenever possible, use natural light, as it provides more uniform illumination and reduces shadows. Position the person near a window or in a well-lit area.
    Use the Smartphone Flash: The oral cavity must be properly lit to allow for examination or photography. Reflections on the teeth or oral surfaces are inevitable and may even help in assessing oral health.

  • Device Stability
    Manual Stability: Hold the smartphone with both hands and rest your elbows against your torso to enhance stability and reduce shaking.

  • Patient and Device Positioning
    Patient Position: Make sure the patient is seated comfortably. The head should be slightly tilted backward to allow better visual access to the oral cavity.
    Mouth Opening: Ask the patient to open their mouth so the Odontoscope can be inserted, then gently close it around the device. Use the Odontoscope to slightly retract the lips for improved visibility of the gum-tooth junction (see Odontoscope instructions).
    Distance and Focus: Hold the smartphone approximately 20 cm (8 inches) from the mouth. Use the camera’s autofocus function, but if needed, tap the screen to manually focus on the area of interest.

  • Image Quality
    Resolution: Ensure the camera is set to high resolution (between 5 and 12 MP, depending on your smartphone) to capture fine details.
    Format: Use the 1:1 (square) aspect ratio, which is better suited for framing the oral region, as it is more “square” than rectangular.

If your smartphone does not allow you to select the 1:1 format, take the photo in landscape mode rather than portrait mode.                

  • Flash: Ask the patient to close their eyes before activating the flash, as elderly individuals are often sensitive to bright light. However, avoid using the flash when photographing dentures—especially if the prosthesis contains metallic components.


Having trouble opening your smartphone’s “Camera” app while using a website?
This often happens when camera access has not been granted for your browser. Here’s how to fix it:

📷 How to Perform a Visual Oral Examination in Older Adults and Take Usable Photos for Documentation

🛏️ Create a Comfortable and Reassuring Environment

– Ideally, the examination should take place in the privacy of the resident’s room.
Explain the procedure to the patient to reassure them and encourage their cooperation.


🧼 Hygiene and Safety

Wash your hands and wear disposable gloves.
– Use a new Odontoscope® or the patient’s own device.


👄 External Observation of the Mouth and Face

– Check for any asymmetry, swelling, or dermatological abnormalities.
– Inspect the lips for lesions, ulcers, or signs of dryness.
– Examine the inner cheeks for spots, redness, or white lesions.


🦷 Dental Arches

– If the patient wears dentures, ask them to remove them in order to photograph the underlying tissues:
▪️ Palate and mucosa for the upper arch
▪️ Alveolar ridge and floor of the mouth for the lower arch


🪥 Dental Prostheses

– Place each denture on the photo frame, one at a time, and take a photo of both sides:
▪️ Cameo surface = the tooth-bearing outer side
▪️ Intaglio surface = the inner side that contacts the mucosa


👅 Tongue

– Ask the patient to stick out their tongue in order to photograph the dorsal surface.


📸 Other Situations

– If you observe anything unclear in step 3 (face/mouth), take a photo of the lesion, spot, or swelling to document it.

Dr Simon Benoliel, DDM Paris VII, 1987.  fsbd.org 

Here are examples of usable images that can support clinical evaluations or help compare evolving conditions over time.

Always wear gloves before performing an oral examination! Any facial asymmetry should be photographed frontally, using flash. 

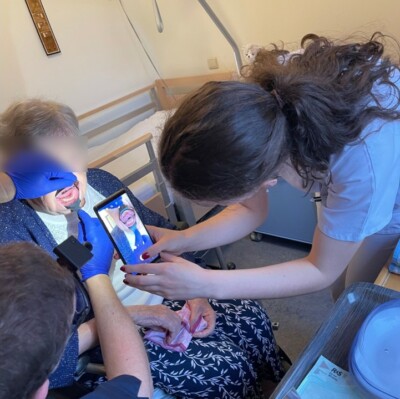
To obtain a clear and usable intraoral photo using the Odontoscope®, the optimal distance between the smartphone and the patient's mouth is approximately 20 cm (8 inches).

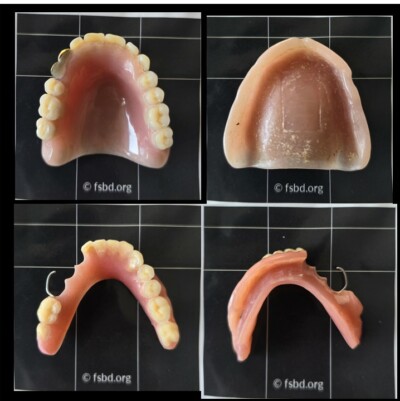
Photos of dental prostheses should be taken without the smartphone flash, using a 1:1 format.

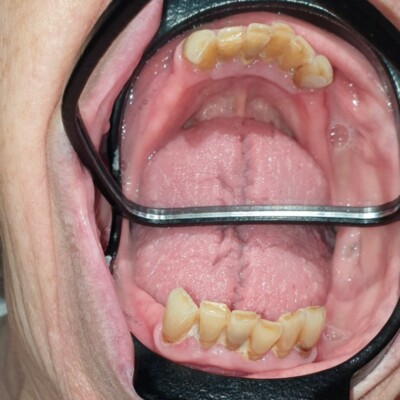
The live view of the vestibular surfaces is clearly visible, as the lower lip is gently retracted thanks to the flexibility of the Odontoscope®.

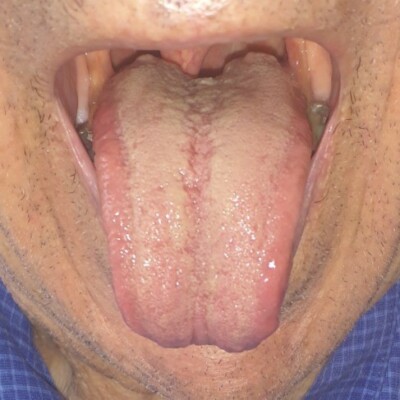
Ask the patient to stick out their tongue as far as possible. Take the photo using the flash.

Use the Odontoscope® to capture this image, using the smartphone flash. Focus should be set on the mirror.


The Odontoscope is a medical device designed to facilitate the examination of the oral cavity.


Frequently Asked Questions (FAQ)


💡 How to Prevent Fog Formation on the Intraoral Mirror

🧴 Use an anti-fog spray

Apply a dental mirror anti-fog spray to the intraoral mirror surface.
Gently wipe it with a clean, soft cloth. This can help prevent fogging for a limited time.

🧽 Wipe with a microfiber anti-fog cloth

Gently rub the mirror with a dedicated microfiber anti-fog cloth before use.


⚠️ Note

These methods can reduce fog formation, but some condensation may still occur in environments with high humidity.
In such cases, you may need to clean the mirror and repeat the process to maintain clear visibility during the examination.

📏 Shape and/or Size Incompatibility

The current size of the Odontoscope® corresponds to the lower average range of adult jaw dimensions, based on multiple studies, including an original study of 200 full dentures from elderly individuals.

🧒👵 This size is primarily intended for children aged 6 to 13–14 years and for older adults.


⚠️ Important Note on Fit

The Odontoscope® does not need to fit perfectly to the patient’s jaw.
It is designed to be loosely positioned between the teeth and the lips — not tightly pressed or sealed.

📘 Follow the Instructions Carefully

Before use, make sure to read the full user guide, which includes illustrated instructions and a video tutorial accessible via QR code, to ensure proper handling of the Odontoscope®.


🧼 Safe Use – Even with Involuntary Movements

Even if the patient makes involuntary movements during use, the flexibility of the Odontoscope’s material helps prevent injury to the oral mucosa.
🔒 The mirror is fully embedded in a soft silicone shell, ensuring maximum safety.

🔧 Product Quality or Material Integrity Issues

🚫 Poor Surface Quality

Do not use the Odontoscope® if it appears poorly finished — for example, if the surface is not smooth, or if there are small protrusions or visible porosities.


🔍 Deformed Mirror

Do not use the Odontoscope® if the mirror is distorted.
⚠️ This is not a physical safety risk, but it will result in a distorted image, making it unusable.


✴️ Scratched or Broken Mirror

Do not use the Odontoscope® if the mirror is scratched.
Although there is no injury risk, the image will not be suitable for examination.

🧴 The mirror is made of HIPS plastic.
If cracked or broken, the device must be discarded.


🧊 Material Hardening

Dental trays are usually made of rigid plastic, while the Odontoscope® is designed with soft, flexible material.
However, if the material has hardened or lost its elasticity, ⚠️ do not use the device.

🦷 Intraoral Use and Hygiene

The Odontoscope® is intended for use inside the mouth, and may come into contact with saliva or blood, for example in cases of gingivitis.
It is less invasive than a toothbrush, which also comes into contact with saliva and blood during brushing of inflamed gums.


👤 Single-Patient Use

The Odontoscope® is a single-patient device.
It may be reused by the same individual.


🚿 Cleaning Instructions

After use, rinse the Odontoscope® thoroughly with clean water, then store it with the user’s personal hygiene items.

🤢 Gag Reflex — A Common Concern in Dentistry

This is a common issue in dentistry, especially when taking alginate impressions.
In such cases, the material is often pushed toward the back of the throat and comes into contact with the soft palate, triggering a gag reflex.


Why This Doesn’t Happen with the Odontoscope®

The Odontoscope® does not come into contact with the soft palate, and since it is held manually, it can be easily removed at any moment if the patient feels discomfort.

Patient–Device Incompatibility

Thermoplastic elastomers are widely used in dentistry.
Among the general public, elastomers—particularly silicones—are considered one of the safest materials for oral use, as they are commonly found in baby bottle nipples and other infant products.


🚫 Allergy Information

If the patient has a known allergy to any component of the Odontoscope®, the device must not be used.

🧴 The Odontoscope® contains no latex and no phthalates.